There are many other things that xcrun simctl can do, such as creating and deleting Simulators,
installing apps and photos plus much more. Great if you’re using a CI server and want to have a clean
environment between runs.
After a quick Google I found a few great posts on the matter:
At Unruly the developers have a passion for learning new things. We have many ways of accommodating these
passions, including Gold Cards (which is our version of 20% time), fortnightly Tech Talks (5-10 minute lightning talks) and
Dojos (hour long sessions on a given topic).
Developers can propose to run a single Dojo, or a series of Dojos, on a topic of their choosing. This allows anyone that’s interested
an opportunity to learn something new or try a technology that another team is using.
We usually run a Dojo session every Wednesday at 12:00 during work time, which lasts for one hour.
Some of the topics we’ve covered already are:
Rust (rojo)
Go (gojo)
Scala
SpriteKit (Apple iOS/OSX game library)
Android
Objective-C
Conway’s Game of Life
Javascript Promises
Swift
Java 8
CSS
I really wanted to learn more about how CPUs worked so I proposed to run a series of Dojos on writing a very simple CPU emulator.
The CPU
I realised that the CPU should be very simple so we could all grasp what was going on and write some code within the hour.
That ruled out modern CPUs, even 8bit ones, as they have lots of registers and opcodes.
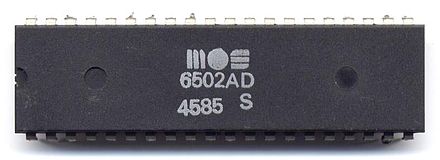
For this reason I looked towards the CPUs of my video gaming youth and settled on the MOS 6502
which was used in many of the great computers of the time:
BBC Micro
Commodore 64
Nintendo Entertainment System (NES)
Atari 2600
Apple IIe
Running a successful Dojo
When running a Dojo it’s best if you can:
find an interesting topic
cover some core parts of the topic
create interesting challenges
make it rewarding and make it feel like people have achieved something
fit all this into one hour blocks (for the style of Dojo we run)
Introducing the parts of a CPU
The main reason I wanted to run the Dojo was to encourage myself to learn more about how CPUs worked and I thought others would
find it interesting too. For that reason I’m pretty sure there are a few things which are incorrect, but in the end it’s not
that important as the goal was a learning experiment and to provide an outline of how a CPU worked.
We were never going to build a real 6502 CPU emulator in a few hour long sessions so I came up with a cut down set of specs to work towards.
The CPU should:
start small and introduce key components gradually over the Dojo series
have an extremely small subset of opcodes that are similar to the 6502 in name and function but without all the different ways of addressing memory
start with no restrictions on integer size, i.e. we won’t be handling the 8bit nature of adding two large integers and having to deal with 16 bit little endian numbers, as this could be added in a later Dojo
start with a small amount of memory
Lets go Dojo!
The fun part of running a Dojo is that everyone starts off together writing code against the same problem and as this was an abstract problem
people were free to choose whatever programming language they wanted to use.
Most people settled on using either Java or Javascript to write the CPU emulator. What was interesting is that a few people test drove
their implementation from the beginning which held them in good stead for future CPU Dojos. Those that didn’t even write tests soon
realised that even when you’re hacking away at a small throw away hour long problem it is still very valuable to be test driving the
code.
After the first session many people threw away their code and re-wrote it using TDD.
In the first Dojo we start by building an extremely simple CPU with a couple of registers, three opcode instructions and a 16 item size of memory.
I’m using the term item as we aren’t restricting the memory to be byte sized at the moment.
This is a great introduction to how programs are stored in memory, where values required by the opcode instruction sit in sequence order
after the opcode instruction.
The task set out is to:
store the number 100 into register a
add the number 7 to register a
store the value of register a into memory address 15
In this Dojo we add more registers, some more opcodes for incrementing and decrementing register values and start delving into the exciting world of branching.
I wrote a simple program which used a couple of registers and added branching to allow a section of code to be executed a number of times before continuing on
with the rest of the program.
In the same vain as machines like the Commodore 64 we reserve a certain area of memory to be treated as video memory. Well in this Dojo I just
wanted people to read back the values of that memory location as ASCII and tell me the song lyrics that were there.
Let’s make it easier to write more complicated applications. In this Dojo I introduce subroutines which allow us to
write reusable functions.
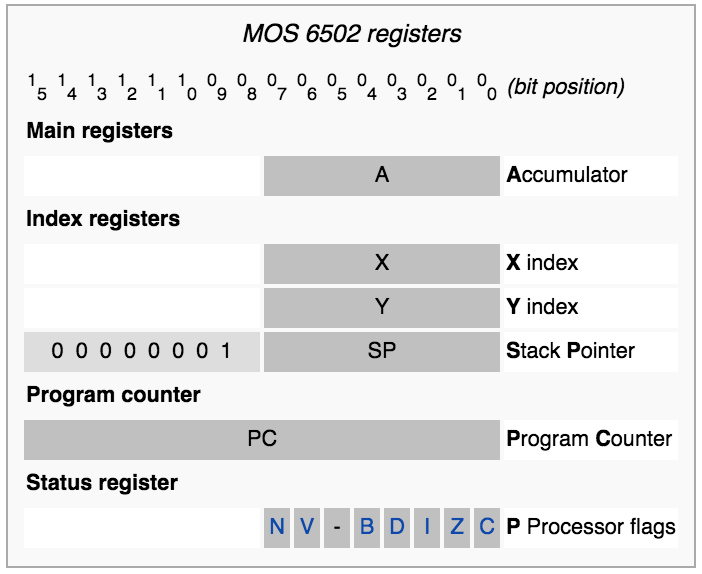
To support subroutines we need to add a new register, the stack pointer, which will point to a memory address of where the current stack head is.
By adding a stack to the CPU we can push the current program counter onto it when executing a subroutine and to pop it off again to jump back to where we left off.
To simplify things I suggested that we reserve the last x items of memory to be reserved for the stack.
I then rewrote the previous song lyric application using subroutines to see if people could get it to run on their updated CPU.
As we started to flesh out our CPU I thought it would be nice to be able to write code in a more human readable format, so in this Dojo we set out to
write a simple assembler.
That means instead of machine code (a series of bytes) like this
I then rewrote the song lyric application again but this time in our assembly language (modelled on the 6502 assembly language) and gave it to the developers to compile into machine
code and then execute on their CPU. It included many subroutines and nested subroutine calls to ensure things weren’t that easy.
Example of part of the assembler, in this snippet we’re looping three times and jumping to other subrountines
That’s as far as we got with this particular topic. There are many things I wanted to do, including:
getting people to write their CPU’s again, or update them, to be real 8bit CPUs. That means when adding up two large bytes like 200 and 150 you will need to
store the result in two memory addresses (16 bits) and in little endian order. This would also mean that we’d need to start thinking about having more opcodes for the same instruction, one for
reading/writing 8bit numbers from memory and one for 16bit. There would also be a need to think about signed and unsigned numbers.
reserving a section of memory to act as video memory and then drawing a circle. Unless the application to draw the circle was supplied then I’m not sure this would be achievable in an hour.
It would be good homework though for those that are interested
Example implementations from our Dojos
Here are some of the CPUs that people implemented in the Dojo sessions:
Easy 6502 - excellent 6502 assembly introduction with emulators embedded directly in the tutorial which have the ability to step through each assembled instruction in the
program and inspect the registers and memory.
Visual 6502 - Want to see all of the transistors and paths taken for every opcode overlaid on a photo of a real 6502 while a program is running, then look no further!
I hope that has wet your appetite to learn more about CPUs and perhaps run a Dojo within your team.
Let me know how you got on or have any suggestions via @timpickles on twitter or email me
I want to start a new library in Javascript ES6 but also use it within our production ES5 code which uses RequireJS.
I created a quick spike to see how straight forward this would be.
Turns out it is very easy thanks to 6to5.
My goal was to create a simple RequireJS module which requires the ES6 transpiled module as a dependency.
Writing the modules
The ES6 module uses some of the new ES6 language features, class, static, const and the simpler method definition.
The module will export a class called Hello with a static function render() to add an H1 to the page.
This will the be transpiled to a file named say-hello-es6.js.